|
The photo technique pages of which this is the first one are thought to deal with issues that are not or only to a small extent covered elsewhere.
A few pictures have a mouse-over effect reveiling pictures behind them. Your computer, tablet or other device need accept flash to see them.
|
Bringing yourself into the picture.
Or how to take better selfies.
Equipment
Every kind of camera from mobile or cell phone to professional SLR (single lens reflex) camera can be used. A tripod of some kind is in most cases a must and, if possible with your camera, a remote control device with delay is highly recommended.
Why bother?
Want a new avatar for your email signature or an internet forum, a picture for renewal of your passport or driving license, another profile picture for Facebook, or you name it. Or a picture to go with an application for a new job?
Want to be depicted in front of the Eiffel Tower or some other tourist attraction, you alone or in accompany with people dear to you, moments in life never to be forgotten? Or you should show off your new car with your self in front of it, or you have another hobby or interest that somehow involves you and should bring you into the picture.
Need a person in your composition? The only person at hand might be you.
Want to fulfill a wish from parents or children of a portrait of you? Ever considered that you as a photographer might belong to the breed of the least photographed people in the world? You are covering family gatherings and bigger or smaller events. You are always there with your camera; you’re are taking pictures of wife or husband, children, grand children, other members of the family, friends etc. Hundreds or even
thousands of pictures. The more pictures you take, the more likely it is that you are not photographed yourself.
Vanity or even bad taste to take your own picture? No, some day some will look for good photos of you and regret they didn't take any themselves. Or that you didn't.
Most great painters have worked with self portraits, by the way.
Oxford Dictionaries has announced selfie as their international Word of the Year 2013.
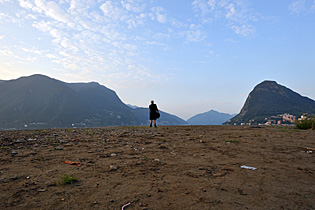
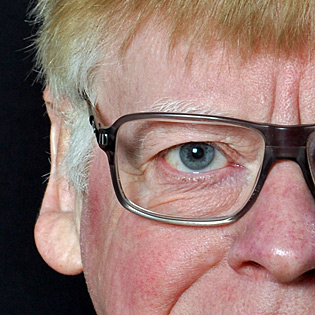
Objective: Photographer to be part of the composition.
Lugano, Nikon D700
How?
The following deals with bringing you, the photographer into the picture. How to do and especially how to make the best of it?
Point the camera (or mobile phone) at you and shoot. The real selfie.
Here we talk portrait, head and shoulder only. Extremely simple, no extra accessories are needed. But, don't expect hig quality. A technique for fun pictures, and hardly anything else.
Have another person take your picture
Fine, if you know the person, and he or she is capable to do it. If you are on your own - on a business trip for example - and want a picture of your self with the Eifel tower in the back ground and ask another person to take your picture you are at a risk of saying good bye to your camera and a lot of good photos on the memory card. Even criminals can look most trustworthy. They may be talented shop lifters as well, so getting them selves dressed
up to high standards, might be peace of cake. If you chose this solution ask a person who is there with his or her family.
Use a mirror
You get a mirror image, no wonder. And you loose a lot of sharpness, especially if the reflecting surface is not a mirror but a window or some kind of metal. On top of that your face shall probably be covered by your camera. Yes, you can take pictures with the camera away from your face, but then it might not focus on you and you'll get an even more blurred result.
For portraits the mirror thing therefore is hardly a good solution, but can be fine for the 'I have been here' picture. Behind you in the mirror you might have something indicating the place.
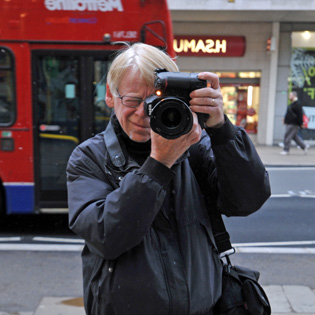
Picture taken through mirror within a shop on Oxford Street in London. Nikon D700.

Other ways to use the mirror effect.
Lugano and Barcelona. Nikon D700.
Use the self timer
A self timer is to be found in every camera, from the cheapest to the most expensive one. And yes, it has its limitations, but still it is able to do a lot of things very well.
Come in mind; it is always difficult to take pictures of one self, because you cannot see exactly what happens in the decisive moment, how you look, what might be disturbing behind you, like branches of trees etc.
You have to keep a distance longer than really needed just to be sure that you are actually within the frame.
Using the self timer means that you may have pictures where the back ground, not you, is rendered sharp. The larger the sensor, (system cameras and SLR's compared to point-and-shoot cameras) the bigger the problem. This is due to the fact that the lens' focal length must be longer, resulting in a limited depth of field.
On some cameras you can, before starting the self timer focus on the point where you are to stand or sit. But very precise it is not. And with a lot of cameras it is not possible or too difficult.
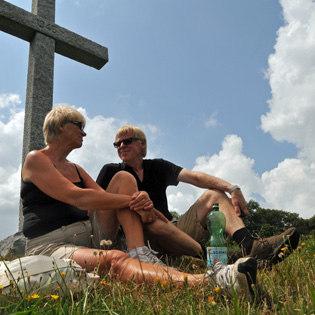
If another person is already there you simply focus on that person, release the shutter and bring yourself in position (self timer). With a remote control you just release the shutter when you are ready. My lovely wife and I.
Lugano, Nikon D300. ML-3.
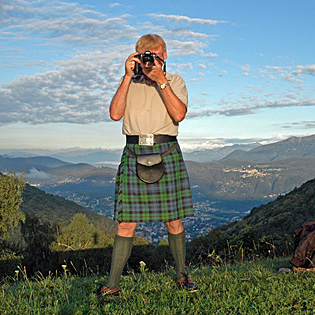
Up the mountains. Switzerland 2006.
Nikon D70. The kilt is in Campbell Ancient tartan.
Many new cameras have a face recognition system. Accordingly they shall focus on your eyes. Some even have a smile timer function and a blink proof mode. But for the self timer function, where you have to be behind the camera when you push the release button, it won't work.
Use a remote control
Fortunately most DSLRs and many system cameras give the photographer the possibility to use a remote control, which is based upon IR- or RF-signals.
The big advantage over the self timer is that when the camera focuses, it does it on YOU.
Therefore you can take sharp head and shoulder portraits or you can be ten or more meters away, should you use yourself as part of the foreground.
Just press the remote control and after two-three seconds the shutter releases (be sure to buy a device with delay possibility), time enough to get the remote control out of sight.
Wi-Fi tethering
It means connecting your camera
via Wi-Fi with a computer, a phone or a tablet and letting you on screen see what the camera
sees and control it from the device.
Wi-Fi adapters or built-in functions shall probably make other wireless remote devices obsolete and - when prices come down - totally replace them. And then taking one's own picture in a good quality should be (almost) just as easy as shooting any other picture.
|
In connection with the launch of Nikon D3300 Nikon devote themselves to selfies:
"You can even use your compatible smartphone or tablet as a remote monitor for the D3300. See what the camera sees and fire the shutter, perfect for self-portraits and group photos that actually include you."
Nikon D3300 announcement 7. Jan. 2014
|
|
Use face recognition
Together with a remote you can also use face recognition, if in your camera.
Does it work? At first I was very skeptical. Then I tried it out on my D90. And yes. It does work. And very well, I must admit. Some pictures in a series may be blurred, really blurred - but most of them are razor sharp.
On my D800 it fuctions even better.
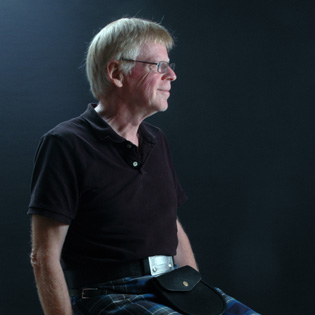
Face recognition with the Nikon D90. 105 mm/f11. Elinchrome studio flash. NIkon ML-L3 remote.
It definitely works.
Instead of a remote use the interval timer function
Some cameras, like the Nikon D800, have a built-in interval timer program. You decide upon the number of exposures, the interval between them and when to start. The camera focuses before each shot. Therefore, when you are in front of it, you'll be in focus.
Set the interval between exposures i.g. 5 seconds and the number of exposures i.g. 15 and off you go.
The good thing: No accessories are needed (except for a tripod).
As a matter of fact the interval timer may be the best way of all for taking good selfies!
|
The Nikon system
I have only a detailed knowledge about Nikon, but I'm sure Canon, Sony etc. offer similar possibilities.
Remote controls
Nikon ML-L3
With Nikons having a built-in IR-receiver you only have to buy a tiny and very cheap remote control named Nikon ML-L3. With this you can take as many pictures as you like without having to go back to the camera after each exposure (an exception might be D40 and D60?)
D40 Series
D60
D3000, D3200 (but NOT D3100)
D5000, D5100, D5200, D5300
D50
D70 Series, D80, D90
D7000, D7100
D600, D610
Nikon1 J1, J2 but NOT J3 and S1
Nikon 1 V1, V2
Coolpix A, P7800, P7700, P7100, P7000
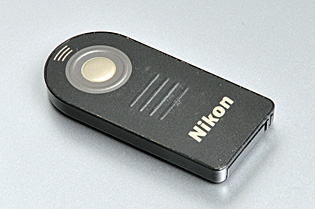
The cheap Nikon ML-L3
Nikon ML-3
The much more expensive Nikon bodies did not or do not have a such built-in IR receiver:
D100 (with battery grip mounted)
D200
D300 Series
D700
D800/800E
D1 Series
D2 Series
D3 Series
D4
For
them you need a combo (a receiver and a remote).
Nikon has a very well functioning big plastic thing for these cameras, named Nikon ML-3. It is just as good as the ML-L3. But the missing L will cost you about ten times the price of the ML-L3. Or more than half the price of a brand new Nikon D3200 with a 18-55 mm kit lens and a ML-L3!
When in the autumn of 2012 my ML-3 got stolen I instead bought a hardly used Nikon D90 with an 18-105 mm AF-S Nikkor, a UV protection filter and a Nikon shoulder bag. Yes, it was more expensive than a ML-3, but not that much!
|
|
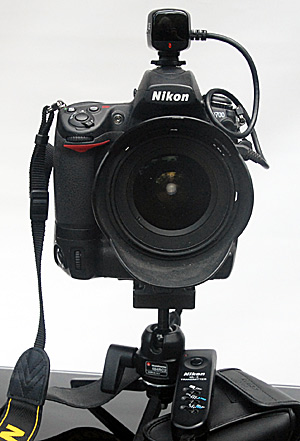
Nikon D700 with the Nikon ML-3 set. The receiver is mounted in the hot shoe and the transmitter is to see next to the most handy Manfrotto 209 table top tripod
|
Nikon WU-1a wireless adapter
With the Nikon D3300 (launched 7 January 2014) you are, in connection with the rather affordable WU-1a (in the first place designed to sending pictures from your camera to your phone or tablet), now able to use your smart phone (iPhone and Android) as a remote control.
It should also function as a remote with the Nikons Df, D5200, D7100, perhaps D3200? and with a few Coolpix models, among then the Coolpix A and 7800.
It probably has no delay function, but being a Wi-Fi system you don't have to directly point your phone at the camera.
Nikon WU-1b wireless adapter
Same function as above WU-1a but for Nikon D600 and D610, Nikon1 S1, V2, J3.
Nikon wireless system WR-T10/WR-R10/WR-A10
This rather expensive RF-system is for professional Nikons like D800 and D4. It has - unlike the ML-3 no delay function but this might be obtained by means of the camera's own exposure delay mode.
It should also function with D200, D300 Series, D700, D2 Series, and D3 Series.
With the Df and other Nikons, having the IR receiver, it should work too, and here you don't need the WR-R10 remote controller adapter.
Interval timer
This function can be found on the following Nikon DSLRs:
D5000, D5100, D5200, D5300.
D7000, D7100.
D600, D610.
D200, D300, D300S.
D700, D800 Series.
D2X, D3 Series, D4 Series
Face recognition
Face recognition is to be found on D3100 - where it in this connection is useless - on D3200, D3300, D5100, D5200, D5300, D90, D7000, D7100, D300S, D600, D610, D700, D800, D3 Series (I guess) and D4, as well as on Df and D3300 (I suppose).
As of 9 January 2014
|
|
A dissapointing substitute for the expensive Nikon ML-3
For my Nikons D700 and D800 I still wanted a remote solution, and I happened to find what was supposed to be a good one, a Phottix Plato. The price was a third of the Nikon ML-3. Its reach about 10 times longer, and unlike the other third-party remotes, I had tried, the Phottix didn't consume batteries over night, as they did, even when they were turned off.
However, only half a year after purchase I could no longer check the pictures I had just taken, unless I detached the cord from the socket on the camera, a rather annoying thing to do. Also the display on top of the cameras started to look rather different when the Phottix was connected.
Therefore I have once again bought me a ML-3. It is way overprized. But it works and I feel assuered that it will continue to do so.
|
|
Want to control your professional Nikons from your smart phone or tablet?
As neither the WU-1a nor the WU-1b is compatible with D800/D4 or their predecessors you may rely on third party solutions.
A promising device is named CamRanger. You buy the adaptor, download a free app for your iPhone, iPod or iPad and connect the adapter with a short cable to the USB port of your (newer) Nikon or Canon DSLR, set to live view.
On your iOS device you cannot only see what is going on in the camera
before and after exposure; by means of the app you can also wirelessly control
many camera settings, like focus, shutter speed, aperture, ISO, exposure compensating etc. And the CamRanger includes a delay function. The price is approx. US$ 300, not much more than the Nikon WR10 set (without a screen view) or the - in comparison - rather primitive Nikon ML-3.
By now the CamRanger app should also be available for Android and Windows phones and tablets.
www.camranger.com
|
Use a tripod
You need a tripod. A small one like my Manfrotto (Bogen) table top tripod, No.209 will often do – even with heavy cameras mounted - and it is easy to bring with you.
A ball head to accept a camera plate for easy mounting is most practical.
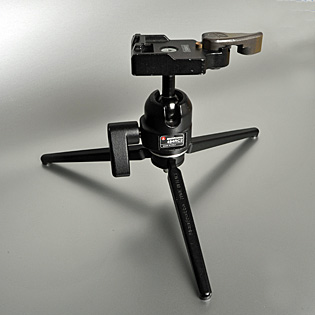
Manfrotto 209 table top tripod. The RC2 type ball head makes mounting and detaching the camera extremely easy. The secret is the Quick release 200PL camera plate system. It takes even big and heavy cameras.
A big tripod has the advantage that the camera can easily be positioned in any level. Be aware, however, that eye level can result in rather boring pictures. A lower position often gives new creative possibilities and you might easier eliminate an otherwise disturbing background as well.
|
If you in magazines are examining fashoin photos you'll probably find out that most of them are taken from a level around waist or lower. On locations often at a longer distance and with a tele lens to separate the model from the back grund.
Difficult when you are on your own.
Taking the picture
Find a place without a distracting back ground
unless the background is important, of course.
It is not always that easy. If you use the sky be aware that the camera will often read the light from that, resulting in a well exposed sky whereas you are dark (silhouette).
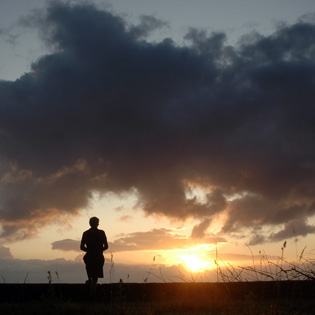
The silhouette effect, here used on purpose.
At Øresund, north of Copenhagen, Nikon D70.
Go for a quite place
Probably you should want, not to have too many people around you. Can be difficult to obtain, sometimes. But even in big cities it possible, for example early in the morning.
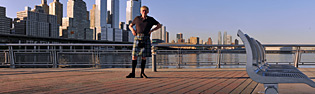
"I have been there". Upper West Side, Manhattan 2011
Nikon D700, 17 mm
Avoid back light
provided you want a picture with texture rather than just shape. If the light is coming from behind your face and the rest of you are in the dark and you shall therefore be rendered without details (silhouette effect again). On most cameras you can compensate for that by increasing exposure by 1-2 aperture steps - even if you on many cameras have to consult the 'menu' to do it.
By all means it shall cost you in the form of added picture noise and less sharpness.
Often it might better to use the built-in flash as a filler.
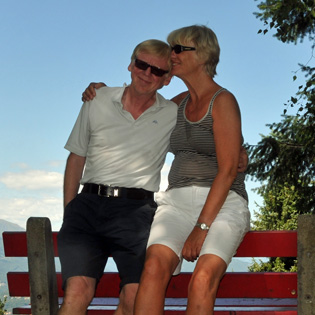
In these pictures, taken on my 65th birthday, by the way, the built-in flash of my Nikon D300 was used as fill light. You may have to experiment a little bit to achieve a good balance between artificial and natural lighting. Lugano, Switzerland, August 2009
Avoid bright sun
Contrast and shadows are hard, especially around noon where the sun is at its highest position. A cloudy, rather dull day might be the best.
Picture taken in shadow with natural saturated colors. The upper part of the body is in a skew angle to the camera.
Costa del Sol, May 2012. Nikon D300 and Nikon ML-3 remote.
Go for front/side light
Light coming from a 45 degree angle will provide good structure and details in clothing etc. The camera shall in most cases give well exposed pictures without corrections.
Don't expect good head and shoulder portraits of yourself with the self timer
When your camera focuses you shall be behind it! Even if you focus on something which might be placed where you are going to be - and that you should by all means - you shall not be exactly there when the picture is taken. Accordingly don't expect you to be real sharp with at lot of details.
If you have the possibility, chose a small aperture e.g. f8 or f11, rather than f2.8 or f4. However, the smaller the aperture, the longer the shutter time - with the risk that you are blurred, due to you moving a little bit. Well, you cannot have it all.
Again, if possible, use a remote.
If you are using a compact digital camera (point-and-shoot) the sensor is tiny, meaning that - if lighting condtions are good - depth-of-field shall be good anyway.
Here the main problem might be a disturbing background - and the fact that a small sensor per definition is not as sharp as a big one.
Nikon D90 plus Elinchrom Studio flash equipment.
Nikon ML-L3 remote.
Try to fill out the frame
It gives better sharpness, but be sure that part of you (inadvertently) shall not be missing In the pic.
Pay attention to your own pose
With the self timer you have about ten seconds for the whole operation. Therefore it can be difficult to relax and take the pose you want to.
With the remote you have all the time you need. And you can take as many pictures as you like with a few seconds intervals. Just take a new pose, release the shutter, conceal the remote and wait for the camera to take the picture.
In most cases a camera level no higher than your waistline shall give the best results.
Often your body should be in a skew angle to the camera and your position upright, or you may lean against something or sit in a relaxed position.
Let your face express what you want to convey.
Check for sharpness and annoying details etc. on the monitor
For one session you may need to shoot many, many pictures. But in digital photography it is free. And a remote shall save you a lot of time running to the camera and back.
In nature especially trees and branches are disturbing elements.
When taking pictures in-home clean up around you. It should not be necessary to mention, but far too often on the internet you see pictures with people standing in a mess.
Adjust and repeat if you are not satisfied.
After the shooting
Be prepared for some Photoshopping
Normally at least some cropping is necessary.

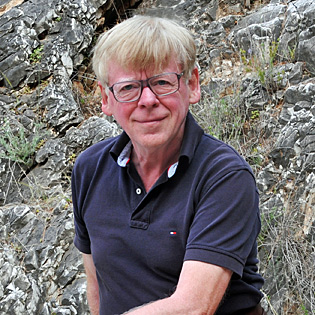
Monte Brè (Lugano) August 2012.
On my 68th birthday. Something to remember.
Nikon D700 and Nikon ML-3.
Latest revision 25 Ocyober 2014
|
